Web Design DIY: Professional, Easy, and FREE
Create a professional and performant website within hours by simply copying, pasting, and customizing the provided code. You can build a professional website entirely on your own, quickly and at no cost!
Free: No charges involved.
Why another tutorial about website? What is different compared to others?
More than a tutorial, this is a copy-and-paste ready-to-use website. Actually, it is not a tutorial. Inside the code, there are comments, and you can start acting directly. Learn while playing. Get your website ready before learning. It is extremely concise.
- How can you create a website for free?
Well, we don't create it; you will do it by yourself. - How do I make my own website?
Follow this website example and ask for support.
HTML is the base
The web pages of this website are a mix of HTML/PHP/CSS without a database. A basic knowledge of HTML can help in this DIY website.
Don’t you know HTML?
Don’t worry, just copy and paste! Yes, you can do it anyway.
Unzip the content and place the folder where you want on your computer.
Open the folder and you will find these files:
- index.php
- menu.php
- services.php
- contacts.php
- aboutus.php
- privacy.php
- css.css
Gradual way: Learn how it works
Start with the index (the home page MUST be called index). You have to edit the code.
To edit the code, you can use any HTML editor or even Notepad, but I suggest you download and install Notepad++. It will give you a clearer vision of what you are doing. You can download it (it is FREE) here.
If you are using an Apple computer, try Sublime Text or Visual Studio Code instead because Notepad++ does not run on Apple devices..
To visually see the result of a PHP file on a computer that is not a server, you must have the Firefox browser installed, which is also FREE. Download it here if you don’t have it yet.
Now right click the index.php file and choose /open with/Firefox.
You will see in your browser the home page of this do-it-yourself website (but you will not see the menu till you upload it to a PHP hosting).
Ok, now again right click the index.php file and choose /Edit with Notepad++ or /open with/Notepad++.
The code will appear:

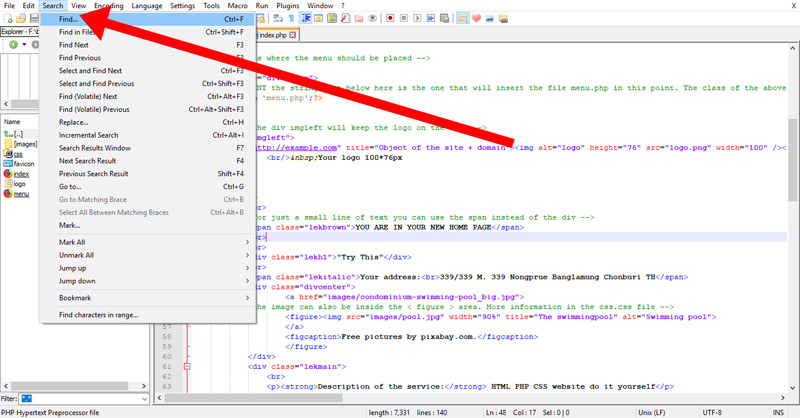
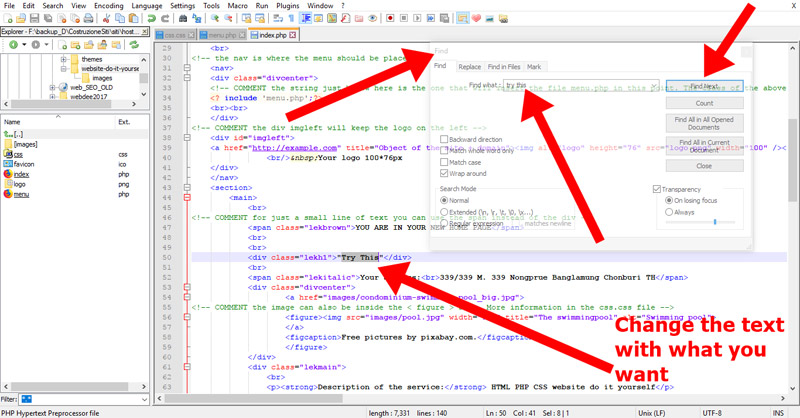
In Search/find, write “Try This” (see image below), click "find next" to instantly locate that text. Change the text “try this” to “whatever you like”.

Save and reload the browser (Firefox). You will see that the text “try this” is now your new text.
Now you are 99% done with the knowledge of HTML/PHP . Oh, I forgot: to go down one line in HTML, insert this syntax:
<br>
and the
<a href="here-the-name-of-the-file-where-the-link-point-to">link</a>
is the link. The
<p></p>
is a paragraph.
After reading this entire page, follow the comments in the code of the downloaded files, and you will understand all. There are many other HTML syntaxes. If you want to learn more, the best place is here, if necessary.
Architecture of the webpage
Each page of this website is actually composed of three files: the page itself, the css.css style, and the menu.php.
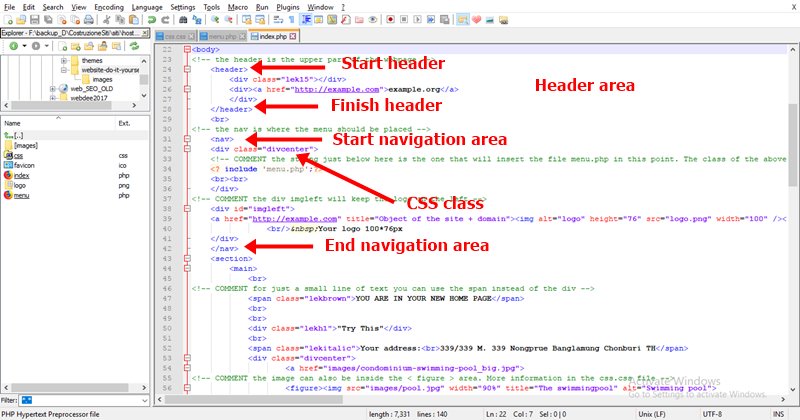
Each page has a header and footer as wide as the browser, and a main part with a maximum width:

<nav></nav> areaYou can copy a page, change its name, and create a new page (for example, pricing.php). Then add the link for that new page in the menu.php file (read the comments in the file menu.php to understand how to do it).
We use some special fonts to enhance the website.
Fonts on website pages are different from those used in other work: in Word, Photoshop, or any other program, you can choose any font you like or download particular fonts from websites like websiteplanet.com and others.
Once you choose a font for your website, for example "Cambria", this font will not show up if the visitor's computer (or smartphone) does not have "Cambria" installed.
So, if you use Arial or Times New Roman, you are sure the text will be rendered as you desire, but when you use less common fonts, the results are unpredictable.
As a consequence, you have to use online fonts. The visitor's browser will download the font and render it on your page.
Choose the font you prefer on Google Fonts, but choose only those with a fast download (check the size of the font file itself, usually .woff or .woff2).
Keeping the menu as a separate file helps you add pages: you will not be forced to edit the menu in each page as it will be common for all the pages. Just modify the menu.php.
The same goes for the CSS style: you don’t need to change it in all files. If you want to change the color or font of the text, just modify the css.css file.
Following this concept, you can create more common parts in each page, like the footer or other sections.
The style (colors, font style, properties of the page, and sections) is defined by the CSS code in the css.css file, which is linked in the head part of the page. Don't worry, this also has instructions in the comments. You can edit the CSS in the css.css file.
Just try it; it will be easier than you think. The comments will help you.
In short:
The webpage is divided into areas. Each area has a different style class. The class property is in the css.css file. The areas have a start and an end point:

The website is responsive and can fit any screen of any device. There are many ways to use html/php/css; any of the techniques used in this website example are debatable, but this website is also really fast (if you use optimized images only). In Google PageSpeed Insights, it performs over 90/100! You can try: copy and paste the demo URL ( https://webdee-seoservice.com/website-do-it-yourself/index.php ) into Google PageSpeed Insights.
To optimize the pictures, you should use an image editor with the “save for web” function. Save in .jpg at 39% quality and progressive. Also, resize your new image to match the size of the images used in this example. The website is about creating a website yourself, but you can change it to use for anything you like. Just change the content (text and pictures).
Publish your website
To make your website accessible to everyone, you need an internet domain name and hosting. We suggest buying it from hosting-international.com, but any decent Linux hosting with cPanel will work as well (remember: PHP hosting).
To publish, just upload your files to the public_html section of your hosting, and it will be online. You can use the file manager in your hosting control panel or the free Filezilla FTP program or WinSCP.
Blog
A little tip to create a blog starting with the above DIY website template. To better understand this suggestion, it is assumed you have read this webpage from the beginning.
Simply insert a disqus.com area anywhere on the page or create a new blank page that contains only the disqus.com frame.
First, create an account on disqus.com. You will be able to see, moderate, and delete comments, so your DIY website will become a blog.
Of course, there are other platforms similar to disqus.com available on the internet.
This idea about creating a blog is essentially about adding a comment area to your website. The result is the same. People need to register with disqus.com to leave comments, and many may already be members. The signup process is simplified as they can log in with Facebook, Twitter, or Google.
Contact us for help: info@webdee-seoservice.com
Terms of Service/license of this tutorial template
You can use this website template as you wish.
Limitation: you cannot redistribute it. Yes, you can get paid by a customer to create their website with this code.
Images: the images are for educational purposes and sourced from pixabay.com. You cannot reuse them. Before publishing your website, download new pictures from pixabay.com, which are free!
Use it as it is at your own risk. There is no responsibility or warranty of any kind.
FAQ
- Why another tutorial about websites? What is different compared to others?
This is not just a tutorial; it's a ready-to-use, copy-and-paste website template with comments in the code to help you learn as you go. - How can I create a website for free?
You will do it yourself using the provided template and support available on the site. - How do I make my own website?
Follow the example on this website and ask for support if needed. - Do I need to know HTML to use this template?
No, basic knowledge helps but isn't necessary. The comments in the code will guide you. - What do I need to publish my website?
You need an internet domain name and PHP hosting. Upload your files to the public_html section of your hosting. - Can I use this template for a blog?
Yes, you can add a Disqus comment area to create a blog-like experience on your site. - What are the terms of use for this template?
You can use the template freely but cannot redistribute it. Images from pixabay.com are for didactic purposes and should be replaced before publishing.
Disclaimer
The companies mentioned in this article are based on our personal experience and editorial judgment, not on objective tests. Non-mentioned companies should not be considered inferior; there are many other reliable providers that may also meet your needs.
Home
🛍 Products
฿ Pricing
Fast Websites
Fast E-commerce
SEO Website
Real Estate Website
Small E-commerce
Contacts
About Us
Small Website
E-commerce in Your Site
🛒 Professional E-commerce
Professional SEO E-commerce
2 Languages Website
⚡AMP HTML Website
E-commerce Article
WordPress
Quotation and Order
High Traffic Website
CMS Update Your Website
Domains & Hosting
How We Make the Website
📰 Mobile Website Article
Types of Websites
Social & Marketing
Web Design
🤔 Do it Yourself
All web services
Go up ↑